# 스윙페이지-장바구니

장바구니는 **관심이 있는 상품, 구매할 예정이 있는 상품을 보관하는 페이지이구요.**&#x20;

**장바구니에 넣은 상품을 확인하여 구매할 수 있습니다.**&#x20;

따라서 쇼핑몰 앱에서는 반드시 꼭\~ 적용해주셔야 하는 페이지입니다.
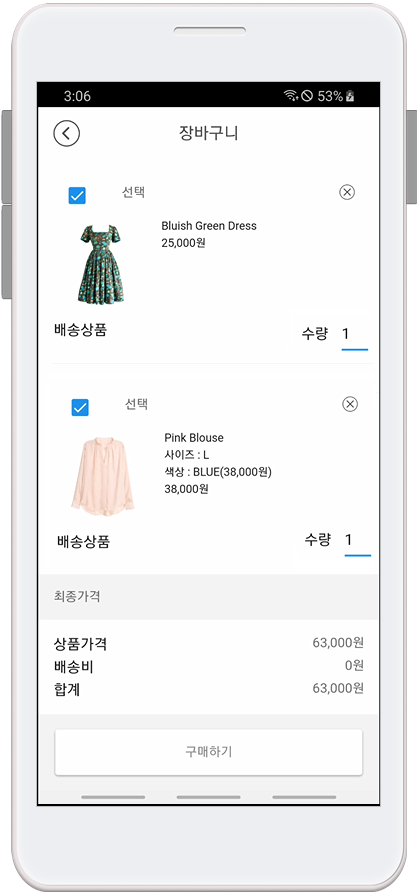
&#x20;

***

<img src="https://684031119-files.gitbook.io/~/files/v0/b/gitbook-x-prod.appspot.com/o/spaces%2FmsJj00k8mj8AcVpnn9Xs%2Fuploads%2Fh1ZOTm1LwERIq6PeR1y1%2Fimage.png?alt=media&#x26;token=00c8e16f-2bf6-4a04-9700-818ee06e1574" alt="" data-size="line"> <mark style="color:blue;">**장바구니 앱 실행화면**</mark>

<div align="left"><img src="https://wp.swing2app.co.kr/wp-content/uploads/2021/02/%EC%9E%A5%EB%B0%94%EA%B5%AC%EB%8B%882.png" alt=""></div>

장바구니 페이지 역시 스윙샵 기능 이용시 이용가능하오니, **스윙샵 서비스 신청 후 적용해주세요.**&#x20;

☞ [**\[스윙샵 신청방법\]**](https://documentation.swing2app.co.kr/shop/swingshop/broken-reference)

![](https://684031119-files.gitbook.io/~/files/v0/b/gitbook-x-prod.appspot.com/o/spaces%2FmsJj00k8mj8AcVpnn9Xs%2Fuploads%2FI0CA8OpKze6WVwOKHrNV%2F%EA%B5%AC%EB%B6%84%EC%84%A0.PNG?alt=media\&token=576171dc-e10f-4248-89fe-df9dab4ee586)

### ![](https://wp.swing2app.co.kr/wp-content/uploads/2020/04/%EB%8B%A8%EB%9D%BD1-1.png) **STEP1. 앱에 장바구니 메뉴 적용하기**&#x20;

#### **-앱제작 V3버전 이용시 적용방법**

<figure><img src="https://684031119-files.gitbook.io/~/files/v0/b/gitbook-x-prod.appspot.com/o/spaces%2FmsJj00k8mj8AcVpnn9Xs%2Fuploads%2FJGa4eYM125x9Fv3OnPdk%2F%EC%9E%A5%EB%B0%94%EA%B5%AC%EB%8B%88.png?alt=media&#x26;token=a7f1cbe3-5f0e-449c-8c8e-ea51174395fb" alt=""><figcaption></figcaption></figure>

1\)앱제작 - STEP3 페이지 선택

2\)메뉴 선택 – 새 메뉴를 만들어주세요. (+ 모양 버튼 선택하여 메뉴 추가)

3\)메뉴 이름 입력

4\)페이지 디자인에서 \[쇼핑몰 기능] 선택

5\)\[페이지]를 선택해주세요.&#x20;

6\)장바구니 확인 후, \[적용하기] 버튼을 선택해주세요.&#x20;

(페이지에 마우스 커서를 가져다 대면 적용하기 버튼이 열립니다)

7\) 화면 상단 \[저장]버튼을 누르면 앱에 적용됩니다.

#### **-앱제작 V2버전 이용시 적용방법**

![](https://wp.swing2app.co.kr/wp-content/uploads/2021/02/%EC%9E%A5%EB%B0%94%EA%B5%AC%EB%8B%88.png)

**앱제작  → 페이지메뉴 단계로 이동합니다.**

1\. \[카테고리 추가] 버튼을 눌러서 메뉴를 추가해주세요.&#x20;

2\. 메뉴명: 메뉴 이름을 입력합니다.

3\. 스윙페이지 메뉴 선택한 뒤

4\. \[링크마법사] 버튼을 선택합니다.

5\. 링크마법사 창에서 <mark style="color:blue;">**\[장바구니]**</mark> 메뉴 선택, \[반영]버튼 선택

6\. \[적용] 버튼 선택

7\. \[저장] 버튼 누르면 앱에 반영됩니다.

![](https://684031119-files.gitbook.io/~/files/v0/b/gitbook-x-prod.appspot.com/o/spaces%2FmsJj00k8mj8AcVpnn9Xs%2Fuploads%2FI0CA8OpKze6WVwOKHrNV%2F%EA%B5%AC%EB%B6%84%EC%84%A0.PNG?alt=media\&token=576171dc-e10f-4248-89fe-df9dab4ee586)

### ![](https://wp.swing2app.co.kr/wp-content/uploads/2020/04/%EB%8B%A8%EB%9D%BD1-1.png) **STEP2. 장바구니 앱 실행화면**

<div align="left"><img src="https://wp.swing2app.co.kr/wp-content/uploads/2021/02/%EB%85%B9%ED%99%94_2021_02_28_03_56_34_792.gif" alt=""></div>

![](https://wp.swing2app.co.kr/wp-content/uploads/2021/02/%EC%9E%A5%EB%B0%94%EA%B5%AC%EB%8B%881.png)

장바구니는 사용자가 쇼핑을 하면서 관심이 있는 상품, 구매할 예정이 있는 상품을 보관하는 페이지이구요.&#x20;

장바구니에 넣은 상품을 확인하여 구매할 수 있습니다.&#x20;

따라서 쇼핑몰 앱에서는 장바구니 메뉴는 꼭!! 넣어주셔야 합니다.


---

# Agent Instructions: Querying This Documentation

If you need additional information that is not directly available in this page, you can query the documentation dynamically by asking a question.

Perform an HTTP GET request on the current page URL with the `ask` query parameter:

```
GET https://documentation.swing2app.co.kr/shop/swingshop/cart.md?ask=<question>
```

The question should be specific, self-contained, and written in natural language.
The response will contain a direct answer to the question and relevant excerpts and sources from the documentation.

Use this mechanism when the answer is not explicitly present in the current page, you need clarification or additional context, or you want to retrieve related documentation sections.
